A pristine image on your home theater screen means nothing if dialogue is muffled, explosions echo like thunder, and music sounds hollow. The culprit? Poor room acoustics. Even with a quality projector and high-end speakers, untreated sound bounces off hard surfaces, walls, ceilings, floors, creating echoes, phase issues, and muddy bass that ruins the experience. Acoustic panels are the practical fix most DIYers overlook. They don’t require permits, rewiring, or hiring a professional: they work immediately. This guide walks through selecting, placing, and installing acoustic panels so a home theater room actually sounds as good as it looks.
Table of Contents
ToggleKey Takeaways
- Acoustic panels absorb sound reflections that bounce off hard surfaces, eliminating echoes and phase issues that muddy dialogue and destroy home theater clarity.
- Strategic placement of acoustic panels on side walls at ear level (2–4 feet high) and front wall corners delivers the highest impact, requiring just 2–3 panels per side to dramatically improve sound quality.
- Absorption panels are the workhorse for home theater; start with these on primary reflection points, then add thicker bass traps in corners if low-frequency muddiness persists.
- Most home theater rooms benefit from treating 20–40% of wall surface area, and a typical 15-by-20-foot room needs 6–10 panels to achieve immersive sound quality.
- DIY acoustic panels cost $30–$60 each using basic materials like 2 lb. fiberglass batts, wood frames, and acoustic fabric, matching the performance of mid-range commercial panels at a fraction of the price.
Why Acoustic Panels Matter for Your Home Theater
Hard surfaces amplify sound problems. Drywall, glass, hardwood, and tile reflect sound waves, causing them to bounce around the room and reach the listener milliseconds after the direct sound from speakers. This delay creates phase cancellation (where two sound waves interfere and weaken each other) and reverberation, which muddies dialogue and destroys the directional clarity that makes home theater immersive.
Acoustic panels absorb these reflections before they bounce. Placed strategically, they reduce room noise, tighten bass response, and let you hear film soundtracks and dialogue as the engineer intended. You’ll notice the difference immediately: dialogue becomes crisp, surround effects pinpoint more accurately, and the soundstage widens. Unlike room-mode problems (low-frequency resonances tied to wall distances), which require bass traps and acoustic measurement, panel placement is straightforward and visual, no math degree required. Most home theater rooms benefit from treating 20 to 40% of wall surface area, though exact needs depend on room size, shape, and speaker setup.
Types of Acoustic Panels and How They Work
Absorption Panels vs. Diffusion and Bass Traps
Absorption panels are the workhorse. They’re typically rigid fiberglass, mineral wool, or melamine foam (2 to 4 inches thick) wrapped in acoustic fabric. Sound enters the porous material, loses energy to friction, and converts to minimal heat. Open-cell foam (like Melamine) is cheaper but less durable and less effective below 500 Hz. Rigid fiberglass (often 2 or 4 lb. density) absorbs across a wider frequency range and lasts longer. Most home theater projects use absorption panels on side walls, front wall corners, and ceiling areas where early reflections bounce toward the listening area.
Diffusion panels scatter sound in many directions instead of absorbing it. They’re useful in larger rooms or control rooms where excessive absorption makes the space sound dead and unnatural. For a home theater, diffusion is secondary: absorption is the priority.
Bass traps target low frequencies (below 200 Hz), where absorption panels alone fall short. They’re thicker (6 to 12 inches), wider, and often placed in corners where bass energy concentrates. If your room booms or the subwoofer sounds uncontrolled, bass traps are essential. If the room sounds relatively balanced and only dialogue is unclear, absorption panels alone may suffice.
Rule of thumb: start with absorption on side walls, then add bass traps in corners if low-end muddiness persists.
Where to Place Acoustic Panels for Maximum Impact
Placement follows the path sound travels. Sit in the listening position and identify reflection points, the spots on walls and ceiling where sound from speakers bounces toward your ears.
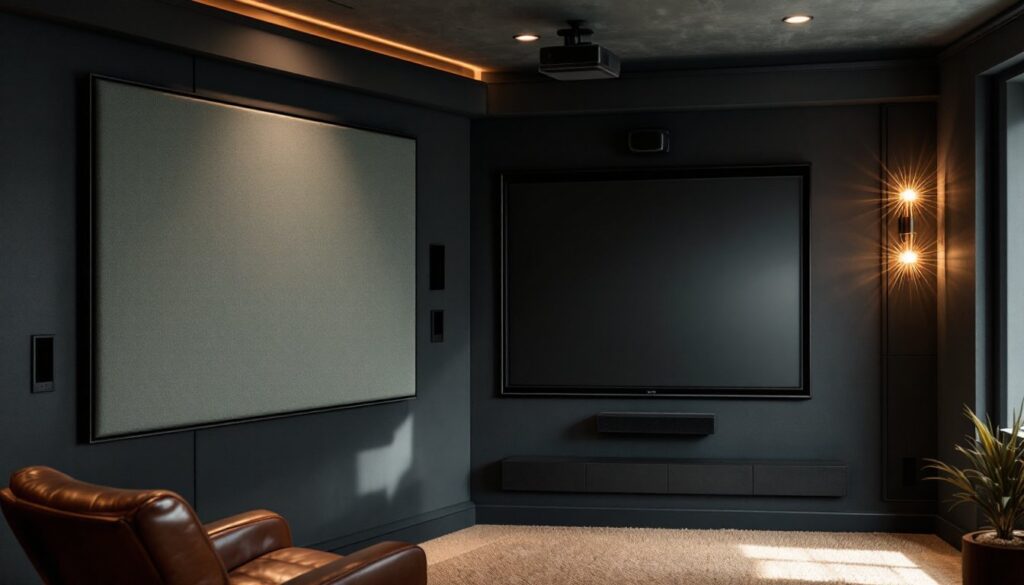
Side walls (first reflection points). Sound from speakers hits the walls closest to them before reaching you. Place absorption panels on side walls at ear level (roughly 2 to 4 feet high) and slightly forward of the listening position. These are the highest-impact placements: even two or three panels per side dramatically improve clarity.
Front wall corners. Bass energy accumulates in corners. Place bass traps in the room corners behind and beside the screen, or use thinner absorption panels if bass traps aren’t feasible. This tightens low-end response and reduces boominess.
Ceiling. Sound from center and surround speakers bounces off the ceiling. If possible, place absorption panels on the ceiling above the listening area. Flush-mounted panels blend in: angled softits are less visible but more work. If ceiling work is impractical, skip it, side wall treatment is 70% of the solution.
Rear wall. Don’t over-treat the rear. Surround speakers already send sound backward: excess absorption makes them lifeless. Use panels sparingly or skip the rear entirely.
Measurement tip: Hold a mirror against the wall. If you can see the speaker from your listening seat, place a panel there. This “mirror method” finds reflection points without measurement gear.
Choosing the Right Acoustic Panels for Your Space
Budget-Friendly vs. Premium Options
Budget panels ($50–$150 per panel). Open-cell melamine foam or thinner fiberglass (1 to 2 inches) wrapped in basic fabric. They’re lightweight, easier to mount, and adequate for casual listening. Downside: less absorption below 500 Hz, and foam degrades faster in humid climates. Brands like Owens Corning and Rockwool basic lines fall here.
Mid-range panels ($150–$400 per panel). 2 to 4 lb. rigid fiberglass or melamine in a quality fabric sleeve. Absorbs across a wider frequency range and holds up longer. Brands like GIK Acoustics and Primacoustic are reliable. Most home theater projects land here for performance-to-cost ratio.
Premium panels ($400+ per panel). Artisan or custom-wrapped panels, specialty cores (wood-fiber composites), or designer acoustic art. They sound identical to mid-range options but cost more for aesthetics. Only worthwhile if the listening room doubles as a living space and you need panels to match décor.
DIY option. Build your own with 2 lb. fiberglass batt (R-15 or R-19 from any home center), wood frame (2x4s), and acoustic fabric. Cost: $30–$60 per panel, plus tools. Effectiveness equals mid-range commercial panels. It requires basic carpentry, cutting, screwing, stapling, but no special skills. Frames are 2x4s (which measure 1.5 inches thick actual) wrapped with fiberglass and stapled fabric, then hung with picture rail or French cleats.
Dimensions and quantity. Most panels are 2 feet wide by 4 feet tall, absorbing roughly 16 square feet per panel. A typical 15 by 20 foot home theater benefits from 6 to 10 panels. Measure your room and identify reflection zones before ordering.
Conclusion
Acoustic panels transform home theater from frustrating to immersive. They’re affordable, non-permanent, and require no wiring or permits. Start with absorption panels on side walls and front corners, the highest-impact placement. If budget and time allow, add bass traps: if not, side-wall panels alone deliver most of the benefit. Measure, place strategically, and listen critically. The difference between untreated and treated sound is night-and-day obvious. Your next film night will prove it.