Building or renovating a bathroom that meets ADA (Americans with Disabilities Act) standards doesn’t mean sacrificing functionality or space efficiency. A smallest ADA bathroom layout with shower can fit into surprisingly tight footprints, often 5′ × 8′ or even smaller, when planned strategically. Whether someone is aging in place, adapting a guest bath, or designing for universal accessibility, understanding the exact dimensions and regulations that govern ADA compliance is the foundation of any successful project. This guide walks through real-world constraints, fixture placement rules, and design tricks that maximize usable space without cutting corners on safety or accessibility.
Table of Contents
ToggleKey Takeaways
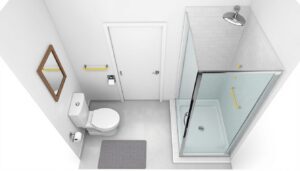
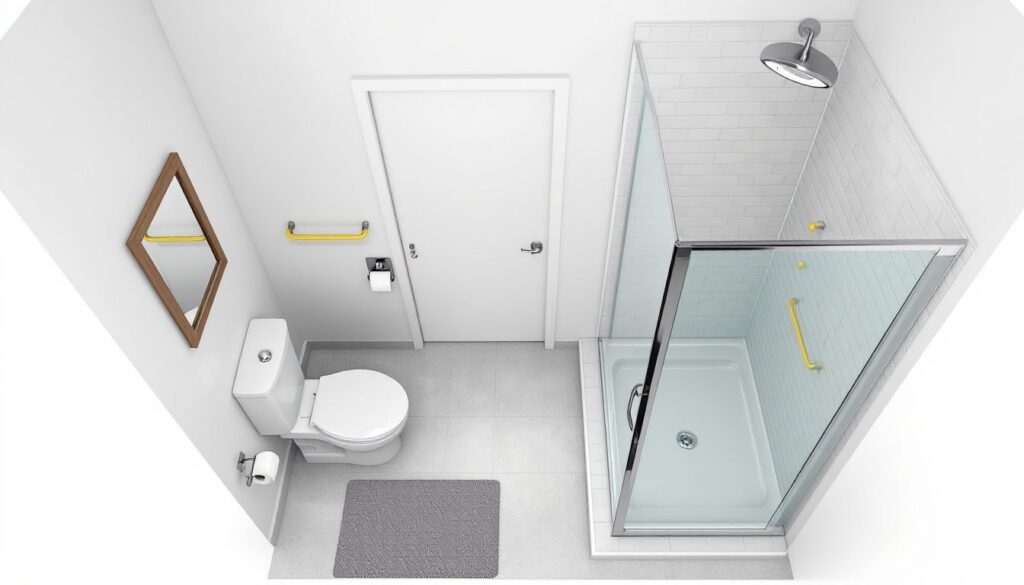
- A smallest ADA bathroom layout with shower can function in a 5′ × 8′ footprint (40 square feet) with strategic fixture placement and a roll-in shower design.
- The minimum wheelchair-accessible clear-floor space is a 5-foot diameter circle, requiring careful positioning of the toilet, sink, and shower to overlap this turning radius efficiently.
- Roll-in showers (3′ × 4′ minimum) are more space-efficient than transfer stalls, eliminating curbs and making the bathroom feel less cramped while keeping the floor clear.
- Grab bars must be securely bolted to studs at 33–36 inches high and support 250 pounds of force—adhesive-only bars fail and create safety hazards.
- Pocket doors, recessed shelving, and wall-mounted fixtures maximize usable space while maintaining accessibility, and vertical storage keeps the floor clear in compact layouts.
- Always verify ADA compliance and local building code requirements with your Authority Having Jurisdiction (AHJ) before starting renovation work to avoid costly rework.
Understanding ADA Bathroom Dimensions and Requirements
ADA compliance isn’t optional guidance, it’s enforceable law for public accommodations and increasingly required in private residential renovations, depending on state and local jurisdiction. The ADA Accessibility Guidelines (ADAAG) specify clear-floor space, turning radiuses, fixture spacing, and grab bar placement. A wheelchair-accessible bathroom requires a minimum 5-foot diameter clear-floor space (a circle in which the chair can turn). In a compact layout, this circle overlaps multiple zones, so positioning is critical.
For the smallest functional ADA bathroom with a shower, plan for a footprint of approximately 5 feet wide by 8 feet long (40 square feet). This assumes careful fixture placement and no dead space. The toilet needs at least 18 inches of clear floor space on both sides: the sink requires a 27-inch-high maximum countertop and 29 inches of knee clearance underneath. Doorways must be at least 32 inches wide (measured from the door frame’s inside edge) to allow wheelchair passage.
Grab bars are non-negotiable. Horizontal bars at 33 to 36 inches above finished floor must support 250 pounds of force. Vertical grab bars in the shower require securement to studs, not drywall alone. Check with your local AHJ (Authority Having Jurisdiction) before breaking ground, as building codes vary by region and some municipalities add stricter requirements than baseline ADA standards.
Optimal Shower Size and Placement for Minimal Spaces
The shower is the space hog in any compact bathroom, so its design determines whether the whole layout works. Two main options compete in tiny footprints: the roll-in shower and the walk-in shower stall.
Roll-In Shower vs. Shower Stall Options
A roll-in shower (also called a curbless or zero-threshold shower) is the most space-efficient choice. The minimum ADA-compliant roll-in shower is 3 feet by 3 feet, though 3′ × 4′ is more practical for turning and washing. The floor slopes gently toward a linear drain or point drain, eliminating the curb barrier. No threshold means a wheelchair rolls straight in, and the design frees up visual space, making the bathroom feel less cramped.
A transfer shower stall (typically 3 feet by 5 feet) includes a low curb or small step: the user transfers from a wheelchair onto a built-in bench. This option saves floor space compared to a roll-in but requires more strength and mobility. Neither is “wrong”, the choice depends on the user’s physical ability and budget.
In a 5′ × 8′ bathroom, a 3′ × 4′ roll-in shower positioned at one end leaves the opposite 5′ × 4′ section for the toilet, sink, and circulation space. If the bathroom is 5′ × 10′, you gain more breathing room. Shower walls need reinforcement at stud locations to anchor grab bars: use concrete backerboard or equivalent moisture-resistant substrate, never paper-faced drywall. The drain slope (typically 1/8 inch per foot) must be built into the floor structure before tile or finish goes down, this is structural work, not cosmetic.
Essential Fixtures and Their Spacing in Compact Layouts
Toilet, sink, and shower each have non-negotiable spacing rules. The toilet needs 18 inches minimum on each side and 24 inches in front (measured from the centerline to the edge of clear floor). In a 5-foot-wide bathroom, a centered toilet eats space quickly. Consider pushing the toilet to one wall and using the other side for maneuvering.
A wall-mounted sink works best in tight spaces. Hang it at 34 inches above finished floor (slightly higher than the ADA 27-inch maximum to reduce splashing). Mount the brackets directly into wall studs or use a reinforced backing board installed during framing. Leave 29 inches of knee clearance underneath and at least 24 inches of clear floor space in front. An undermount or drop-in sink (rather than a pedestal) maximizes leg room for wheelchair users.
The shower faucet should be 38 to 48 inches above the finished floor and reachable from outside the shower stall. Install anti-scald valves (required by most modern plumbing codes) to protect against sudden temperature spikes. Grab bars in the shower run horizontally at 33 to 36 inches and vertically near the entry: they must be 1.25 to 1.5 inches in diameter and securely bolted to studs with rust-resistant hardware (stainless steel or coated). Cheap adhesive-only grab bars fail under real load, don’t risk it.
Smart Design Strategies to Maximize Small ADA Bathrooms
Every inch counts. Pocket doors slide into the wall cavity instead of swinging inward, reclaiming up to 30 square feet of swing space. Standard hinged doors are an option only if your footprint truly allows it. Recessed shelving built into wall cavities (framed during new construction or retrofit into cavities between studs) stores toiletries and supplies without eating floor area.
Lighting and ventilation must still meet code but can be compact. A 2-foot flush-mount ceiling fixture provides adequate illumination: use LED bulbs to reduce heat in humid spaces. A wall-mounted exhaust fan rated for the square footage (typically 50–100 CFM for a 40-square-foot bathroom) removes moisture and prevents mold. Both should be on a humidity sensor or timer to run automatically.
Vertical Storage and Accessibility Solutions
When floor space is at a premium, think tall. Corner shelving units, over-toilet storage, and wall-mounted cabinets positioned at accessible heights (48 inches maximum reach height for items used frequently) keep the floor clear. Avoid clutter on counters, a single towel rack and a toothbrush holder are often enough.
Contrast and color matter for accessibility. Paint grab bars a contrasting color to the wall (e.g., bright yellow on white tile) so they’re instantly visible. Slip-resistant tile or flooring is essential: use products rated for wet areas. Non-slip bath mats in the shower prevent falls. Install a heated floor mat or use radiant heating if budget allows, it’s luxurious and practical for aging users.
Conclusion
Designing the smallest ADA bathroom with shower requires balancing strict accessibility requirements with spatial constraints. A 5′ × 8′ footprint is genuinely feasible when you prioritize fixture placement, choose a roll-in shower over a curbed stall, and eliminate wasted circulation. Grab bars, drain slopes, and anti-scald valves aren’t optional upgrades, they’re code compliance and user safety. Verify requirements with your local building department before starting: hire a plumber and electrician for rough-in work if you’re not experienced with structural changes. With careful planning, a compact ADA bathroom can feel open and functional rather than cramped.