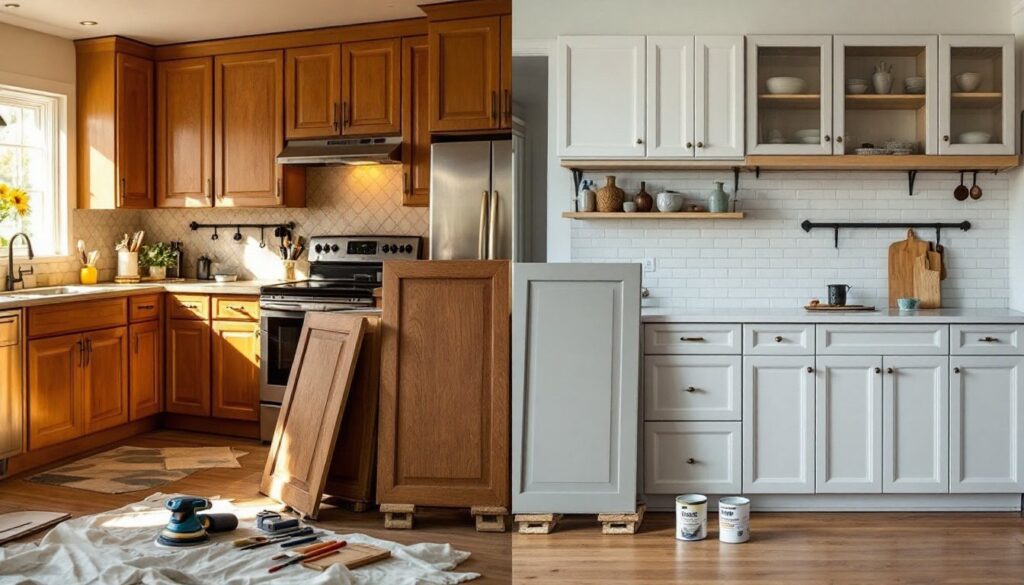
Oak kitchen cabinets were a staple of 1990s and 2000s kitchens, durable, affordable, and sturdy enough to last decades. But by 2026, those honey-toned wood grains and heavy finishes look dated next to sleek modern kitchens with soft whites, warm grays, and minimalist hardware. The good news: homeowners don’t need to rip out cabinets entirely. A thoughtful cabinet update can transform the entire kitchen’s aesthetic for a fraction of a full replacement. Whether refinishing existing oak cabinets or swapping doors and hardware, the transformation is dramatic, achievable in a weekend or two, and well within reach for a confident DIYer.
Table of Contents
ToggleKey Takeaways
- Updating oak kitchen cabinets through refinishing or replacing doors delivers a modern transformation for a fraction of full cabinet replacement costs, typically in just a few days.
- Oak cabinets need updating because their prominent grain and warm honey tones clash with modern design trends favoring soft whites, warm grays, and contemporary hardware.
- Refinishing existing oak cabinets requires proper surface prep with 120–150 grit sanding, stain-blocking primer, and quality kitchen-grade paint applied in two coats minimum to prevent tannin bleed-through.
- Soft white, warm gray, and matte black are the most popular modern finishes that completely transform dated oak cabinets while maintaining durability and kitchen functionality.
- Quality soft-close hardware, brushed brass or matte black metals, and thoughtful pull placement elevate the entire cabinet update and should match existing faucets and light fixtures.
- A structured step-by-step approach starting with prep and planning, followed by proper sanding, priming, painting, and hardware installation ensures a professional-looking kitchen refresh in 5 days or less.
Why Oak Kitchen Cabinets Need Updating
Oak’s grain structure, those prominent, open pores and distinctive cathedral-grain pattern, absorbs stain and shows every dust particle and water spot. It’s also notoriously difficult to paint evenly because the grain telegraphs through finish coats if prep and primer aren’t flawless. Add in the typical amber or honey undertones that dominated ’90s color schemes, and even well-maintained oak cabinets feel warm and heavy by today’s standards. Modern kitchens lean toward cooler, cleaner aesthetics: soft grays, warm whites, or bold matte blacks. Oak’s natural warmth clashes with contemporary hardware (brushed brass, matte black, stainless), lighting (cooler LED), and countertop trends (white quartz, concrete-look laminate, cool-toned granite). Updating oak cabinets doesn’t mean losing durability, oak is still one of the most resilient hardwoods. It means refreshing the look to match current design preferences and your home’s overall style.
Assessment and Planning Your Cabinet Update
Before committing to any project, inspect the cabinets carefully. Check for damage: swollen or warped doors (especially near the sink), loose hinges, cracked rails or stiles (the frame pieces), and water damage inside. Minor cosmetic wear, surface dings, scratches, faded finish, is fine: structural issues require replacement. Measure cabinet dimensions, door frame styles, and current hinge type (Euro-style cup hinges or traditional pin hinges affect replacement options). Photograph your kitchen under different lighting, especially morning and evening light, to see how colors will look throughout the day. Identify your style: modern farmhouse, contemporary, transitional, or minimalist. This guides finish and hardware choices. Decide scope: refinishing all cabinets, just the island, or replacing doors while reusing frames are all valid options depending on condition and budget. Sketch your layout, even rough notes help when shopping for hardware or paint. Planning prevents expensive mistakes mid-project.
Refinishing vs. Replacing: Which Option Works Best
Refinishing means stripping and repainting or staining existing cabinet boxes and doors. Replacement means buying new doors (and sometimes drawer fronts) to install on the existing box frames. Refinishing works best if cabinet frames and boxes are solid, corners are square, and you don’t need to change the footprint. It’s cheaper (paint and sandpaper costs versus $3,000–$8,000+ for new doors), faster (days instead of weeks), and kinder to the environment. The catch: refinishing oak requires patience. The grain must be sanded smooth (120–150 grit), primed with a stain-blocking primer, and painted with quality kitchen-grade paint (two coats minimum). Sanding dust is fine and settles everywhere, so expect prep and cleanup time. Replacing doors skips sanding entirely and guarantees a perfect finish, new doors come pre-finished. Replacement costs more upfront but delivers a showroom look and is faster if you’re methodical with hinge installation. For budget-conscious DIYers: refinishing. For speed and perfection: replacement. For moderate budgets: refinish cabinet boxes and replace doors only.
Popular Modern Finishes That Transform Oak Cabinets
Soft white remains the safest choice, bright, clean, and complements any countertop or backsplash. Use a warm white (greige undertones) rather than stark white if your kitchen has yellow or incandescent lighting: cool whites look harsh in warm rooms. Warm gray is trending hard in 2026: think Benjamin Moore Gray Owl or Sherwin-Williams Alabaster with gray shifts. These feel modern without cold sterility. For drama, matte black (also called charcoal or graphite) pairs beautifully with brass hardware, white subway tile, and concrete or light wood counters. Matte finishes hide fingerprints better than gloss: use a satin or soft-sheen kitchen paint, not flat. Warm taupe and greige (gray-beige hybrid) work on islands while keeping base cabinets neutral, creates visual interest without overwhelming. If you’re keeping oak visible, consider liming (whitewashing the grain to soften its appearance) or cerusing (filling grain with white or metallic paste for an aged look). These techniques embrace oak’s character while modernizing it. Always use kitchen-grade paint or conversion varnish, bathroom and bedroom paint won’t withstand moisture, heat, and daily grease exposure. Test your chosen color on a sample board in your kitchen under real lighting before committing to 20+ cabinet doors.
Hardware and Accessories That Complete the Look
Hardware makes or breaks a cabinet update. Cheap hinges squeak: quality soft-close hinges (soft-close and slow-close are the same thing) prevent slamming and feel premium. Cup hinges and European-style hardware are standard on modern cabinets: traditional pin hinges date a kitchen instantly. Choose handles and knobs in metals that match your faucet and light fixtures: brushed brass (warm, trending), matte black (modern, bold), stainless steel (sleek, timeless), or oil-rubbed bronze (traditional). Avoid mixing too many metals, two max (e.g., brass pulls and stainless hinges is fine: brass, chrome, and bronze looks chaotic). Pull spacing matters: standard is 2–3 inches from the corner or edge. Measure twice before drilling. Cabinet lighting, under-cabinet LED strips or puck lights, completes a modern look and is surprisingly affordable (kits run $30–$60). Glass inserts on a few upper doors add visual interest without the commitment of open shelving. Interior organizers (pull-out shelves, spice racks, dividers) don’t change appearance but dramatically improve functionality, often people notice the difference before the finish color.
Step-by-Step Transformation Process
Prep and Planning (Day 1):
- Empty cabinets completely, don’t leave items inside during sanding or painting.
- Remove doors by unscrewing hinges (mark hinge positions with tape for reinstallation).
- Remove drawer fronts if present (usually two screws from inside the cabinet box).
- Label everything with painter’s tape so you remember which door goes where (kitchen layouts aren’t always symmetrical).
- Lay doors flat on sawhorses in a well-ventilated space (garage, basement, or outdoors).
Sanding (Days 1–2):
- Sand cabinet boxes and doors with 120-grit sandpaper, then 150-grit for smoothness.
- Use a random orbital sander for flat surfaces and hand-sand edges, corners, and molding.
- Wear a dust mask (N95 minimum) and safety glasses, oak dust is fine and gets everywhere.
- Sand lightly between primer and paint coats with 220-grit: this improves adhesion.
- Vacuum and tack cloth (sticky cloth) to remove all dust, any dust under paint shows.
Priming and Painting (Days 2–4):
- Apply shellac or stain-blocking primer (two coats): this prevents oak tannins from bleeding through paint.
- Use quality kitchen-grade acrylic or water-based paint in satin or soft sheen (not flat or high gloss).
- Paint two coats minimum, waiting 4 hours between coats: check manufacturer dry time.
- Paint cabinet boxes and interior surfaces while doors dry.
- Reinforce high-traffic areas (around handles) with light sanding and a third coat if needed.
Hardware Installation and Reassembly (Day 5):
- Install new hinges on cabinet boxes following measurements and manufacturer specifications.
- Hang doors carefully, ask a helper to hold them level while you screw hinges.
- Check door alignment: adjust hinge screws if doors sag or don’t close flush.
- Drill holes for new handles using a template (many hardware suppliers provide them) to ensure perfect spacing.
- Install pulls or knobs.
- Reinstall drawer fronts.
- Stand back, adjust shelf liners if needed, and reload cabinets.
Safety Reminders:
- Wear gloves when sanding and priming to protect skin.
- Use respiratory protection (N95 or P100 mask depending on material) when sanding oak or applying primer.
- Ensure good ventilation, open windows and use a fan to push dust and fumes outside.
- Don’t paint in direct sunlight: it dries too fast and causes lap marks.
- Allow 48–72 hours of ventilation before sealing the kitchen if using oil-based or conversion varnish.
Conclusion
A cabinet update proves that transformation doesn’t require gutting the kitchen. With careful planning, proper surface prep, quality materials, and patience, dated oak cabinets become a modern focal point that feels intentional and current. Whether refinishing or replacing doors, the investment is modest compared to full replacement, and the impact is immediate. Homeowners see their kitchen through fresh eyes again, and often wonder why they waited so long.